Running jobs on the cluster and using modules
1. Here at the UC Davis Bioinformatics Core we have a large computational cluster (named cabernet) that we use for our analyses. The job scheduling system we use on this cluster is called Slurm. In this section, we will go through examples of the commands we will be using to interact with the cluster. First, what is a cluster?
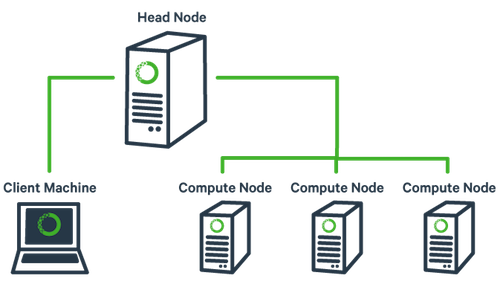
The basic architecture of a compute cluster consists of a “head node”, which is the computer from which a user submits jobs to run, and “compute nodes”, which are a large number of computers on which the jobs can be run. It is also possible to log into a compute node and run jobs directly from there. Never run a job directly on the head node!
2. Now, let’s look at the commands. First, log into the head node (cabernet.genomecenter.ucdavis.edu). The two main commands we will be using are srun and sbatch. ‘srun’ is used to run a single command on a compute node or to log into a compute node directly. Take a look at the options to srun:
srun --help
The way we have set up our cluster requires that you specify a time limit and maximum memory size for your job. If your job exceeds these limits, then it will be terminated. So try running the following to log into a node:
srun -t 1440 -c 4 -n 1 --mem 8000 --reservation workshop --pty /bin/bash
This command is requesting a compute node with a time limit of 1440 minutes (i.e. 24 hours), one processor, a max memory of 8000Mb (i.e. 8Gb), using a compute reservation for this workshop (an option you would not normally use), and then finally, specifying a shell to run in a terminal (“–pty” option). Run this command to get to a compute node when you want to run jobs on the command-line directly.
3. ‘sbatch’ is used to submit jobs to run on the cluster. Typically it is used to run many jobs at once. Look at the options for sbatch:
sbatch --help
Generally, we do not use any options for sbatch… we typically give it a script (i.e. a text file with commands inside) to run. Let’s take a look at a template script:
wget https://ucdavis-bioinformatics-training.github.io/2017-June-RNA-Seq-Workshop/monday/slurm.sh
cat slurm.sh
The first line tells sbatch what scripting language the rest of the file is in. Any line that begins with a “#” symbol is ignored, except lines that begin with “#SBATCH”. Those lines are for specifying sbatch options without having to type them on the command-line every time. In this script, on the next set of lines, we’ve put some code for calculating the time elapsed for the job. Then, we set up the variables for the rest of the script. In this case, “$1” refers to the first argument to the script. So, for example, when you would run this script, you would run it using a sample name like so (don’t actually run this command yet!):
sbatch slurm.sh I892_S88
So the script takes “I892_S88” and puts it into the variable “$1”. We then copy that into another variable called “sample”, for more clarity. Then we use “$sample” to construct the names of the forward (R1) and reverse (R2) read files. The utility of doing this is that we can reuse the same script to run every sample. So to run another sample, we would do this (again, do not run this command!):
sbatch slurm.sh C91_S79
Now, after the variable section, we load the modules that we will be using for this job. Finally, we run the actual commands using the variable names we created earlier. “${sample}” gets replaced with the actual sample name when it runs. And then at the end we calculate and print out the elapsed time.
The stderr and stdout streams for each job get captured to files that use the job ID in the filename and typically end in “.err” and “.out”. These files will be created in the directory that the script is run, unless otherwise specified.
4. There are some more commands that are useful to know in Slurm… ‘squeue’, ‘scancel’, and ‘sacct’. ‘squeue’ (without any arguments) gives you a list of all the jobs currently running on the cluster:
squeue
squeue --help
Looking at the help documentation, we see that we can filter the results based on a number of criteria. The most useful option is “-u”, which you can use to see just the jobs for a particular user ID. The first column gives you the job ID of the job, the second is the partition (different queues for different types of machines), the name of the job, the user who ran the job, the state of the job (R is for running), the length of time the job has been running, the number of nodes the job is using, and finally, the node name where the job is running or a reason why the job is waiting.
The ‘scancel’ command is used to cancel jobs (either running or waiting). You can give it a job ID, or if you use the “-u” option with your username, you can cancel all of your jobs at once.
The ‘sacct’ command is used to get accounting data for any job that has ever run, using the job ID.
You can get more information about each command by typing “
5. Finally, let’s look at the ‘module’ command and its sub-commands. You will NOT find the ‘module’ command on all linux computers. Using modules is generally something that is used on a cluster and generally installed by a system administrator. The module system allows you to easily access any piece of software on the system from any directory. It basically changes your PATH variable (and possibly other environment variables) so that the shell searches the correct directories for the software you want to use. First, take a look at all the software available on our system:
module avail
This is a list of all the software (with different versions) that you can access. Now try running the ‘scythe’ software:
scythe
You should get an error saying that the command was not found. Take a look at your PATH variable.
echo $PATH
These are the directories (colon separated) that are searched for anything you run on the command-line. In order to access a piece of software that is not in one of these default directories, we need to use the ‘module load’ command:
module load scythe
scythe --help
Use the ‘which’ command to find out where the ‘scythe’ command is actually located:
which scythe
You’ll see that scythe is located in a completely different place and yet you are able to access it. This is because the module command changes your PATH variable so that it has the correct directory. Take a look at your PATH again:
echo $PATH
You’ll see that the directory for scythe has been added to PATH.
6. You can also load older versions of software. When you load a module without specifying a version, it will load the default (generally the latest) version. If you need an older version, you need to add the version number:
module load bwa/0.6.2
7. A few more module sub-commands that are useful:
module purge
‘module purge’ will unload all of your modules. Which simply means that it will take out the directories for all of the modules from your PATH variable. Take a look at $PATH now:
echo $PATH
The scythe and bwa directories are gone.
module load scythe
module rm scythe
‘module rm’ will unload the one module you specify.
module load scythe
module load sickle
module load bwa
module list
Finally, ‘module list’ will list all of your currently loaded modules in this terminal/session.