Running the dbcAmplicons pipeline
ALL of this should only be done in an interactive session on the cluster
First login, then
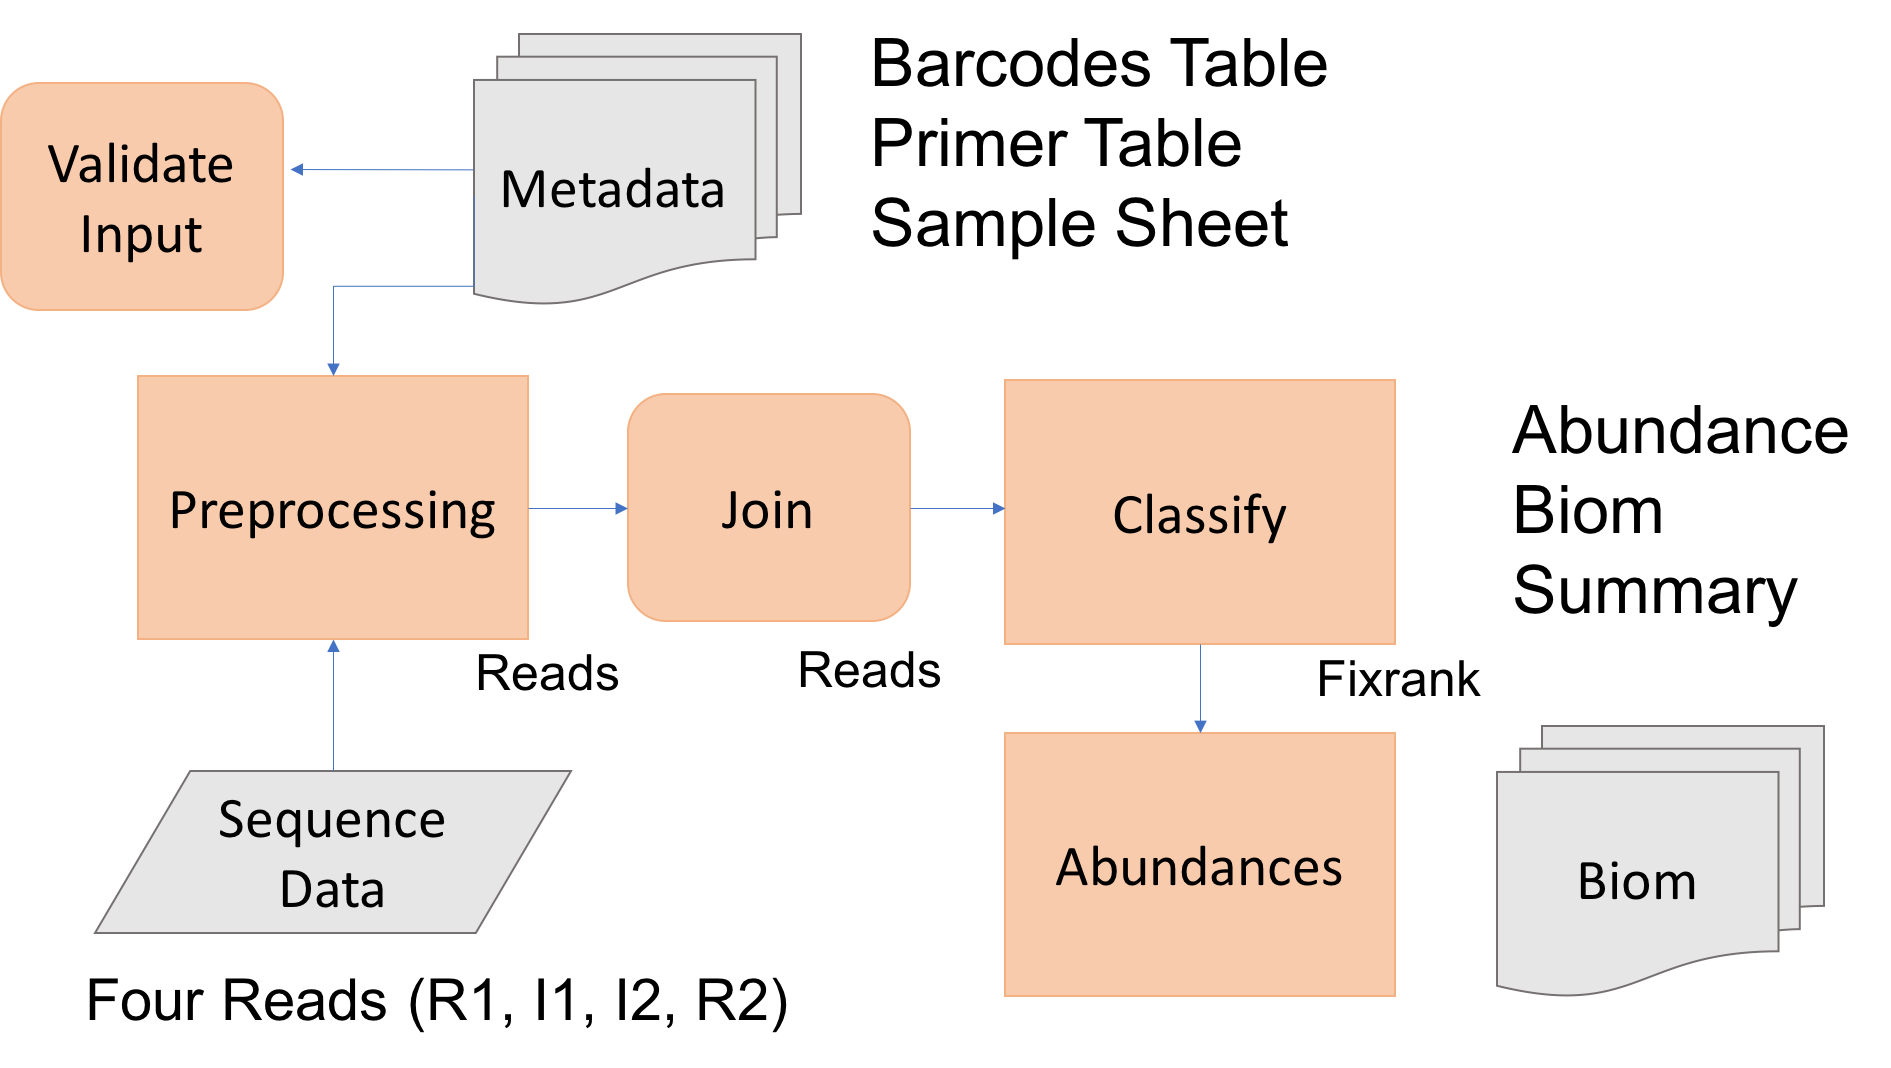
The goal of today is to process raw Illumina sequence reads to abudance tables for the 16sV1-V3 amplicon set. To do so we first need to 1) have all the software installed and working, and 2) have the Illumina sequence data within our project folder (mca_example). We then need to prepare the input metadata files: barcodes, primers, and samples. Amplicon processing with dbcAmplicons includes the following steps: preprocessing, join, classify and abundances.
Today we’ll process at least one amplicon set to completion, should there be extra time, begin processing the others, or over the next week process the others as practice.
1. First lets validate our install and environment
Change directory into the workshops space
cd
cd mca_example
ls --color
you should see 3 directories: bin, Illumina_Reads and src
Lets verify the software is accessible, first source our profile:
source ~/mca_profile

dbcVersionReport.sh
you should see the version info for dbcAmplicons, flash2 and RDP.
Lets look at the first few reads of each file, below is an example line to view the first file.
zless Illumina_Reads/Slashpile_only_R1.fastq.gz | head
Next lets make a metadata directory and transfer our barcode, primer and sample sheet to their
mkdir metadata
We can pull down the already prepared barcode and primer tables from github
cd metadata
wget https://raw.githubusercontent.com/ucdavis-bioinformatics-training/Oct2017-ILRI-Workshop/master/metadata/dbcBarcodeLookupTable.txt
wget https://raw.githubusercontent.com/ucdavis-bioinformatics-training/Oct2017-ILRI-Workshop/master/metadata/PrimerTable.txt
wget https://raw.githubusercontent.com/ucdavis-bioinformatics-training/Oct2017-ILRI-Workshop/master/metadata/workshopSamplesheet.txt
You will also need to transfer the sample sheet you created into the metadata directory
Once all the metadata tables are in the metadata folder, lets go back to the main workshop folder
cd ..
If all this is correct, we are ready to begin.
1. Lets validate our input files using dbcAmplicons Validate:
Look at the help documentation first
dbcAmplicons validate -h
dbcAmplicons validate -B metadata/dbcBarcodeLookupTable.txt -P metadata/PrimerTable.txt -S metadata/workshopSamplesheet.txt
If there are any errors, fix them (can do so in nano) and validate again.
Once we are sure our input files are ok, pass validation
2. Lets Preprocess the data, should talk less than 1 hour. We will be putting all intermediate output to a folder Slashpile.intermediate
Look at the help documentation first
dbcAmplicons preprocess -h
First lets ‘test’ preprocessing, by only running the first ‘batch’ of reads
dbcAmplicons preprocess -B metadata/dbcBarcodeLookupTable.txt -P metadata/PrimerTable.txt -S metadata/workshopSamplesheet.txt -O Slashpile.intermediate -1 Illumina_Reads/Slashpile_only_R1.fastq.gz --test > preprocess.log
View preprocess.log and the file Identified_barcodes.txt, make sure the results make sense.
cat preprocess.log
cat Slashpile.intermediate/Identified_Barcodes.txt
Lets see what it looks like when you get the primer orientation incorrect. Try running the above but add the parameter, –I1 asis. Then look at the output again.
Now run all reads, should talk less than 1 hour.
dbcAmplicons preprocess -B metadata/dbcBarcodeLookupTable.txt -P metadata/PrimerTable.txt -S metadata/workshopSamplesheet.txt -O Slashpile.intermediate -1 Illumina_Reads/Slashpile_only_R1.fastq.gz > preprocess.log
Again view the output to make sure it makes sense
cat preprocess.log
cat Slashpile.intermediate/Identified_Barcodes.txt
Finnally, look at the output in the Slashpile.intermediate folder, how many subfolders are there? What do these coorespond to? What is inside each folder? View a few reads in one of the files.
From now on we will only be performing downstream processing of the 16sV1V3 amplicon set
3. Next, lets merge/join the read pairs, should take less than 10 minutes
View the help documentation and run join
dbcAmplicons join -h

dbcAmplicons join -t 4 -O Slashpile.intermediate/16sV1V3/Slashpile-16sV1V3 -1 Slashpile.intermediate/16sV1V3/Slashpile-16sV1V3_R1.fastq.gz > join-16sV1V3.log
view the log
cat join-16sV1V3.log
Try changing the parameter –max-mismatch-density, first to 0.1, then to 0.5, how do they differ.
If you prefer the default, run join again with defaults. dbcAmplicons join also produces two histogram files (.hist and .histogram) in the output folder. View these files (can use cat, less, more, etc.). What do you see?
4. Classify the merged reads using RDP, should take less than 2 hours
View the help documentation and run classify
dbcAmplicons classify -h

dbcAmplicons classify -p 4 --gene 16srrna -U Slashpile.intermediate/16sV1V3/Slashpile-16sV1V3.extendedFrags.fastq.gz -O Slashpile.intermediate/16sV1V3/Slashpile-16sV1V3
classify produces a fixrank file, view the first 6 lines of the output file
head Slashpile.intermediate/16sV1V3/Slashpile-16sV1V3.fixrank
For the other amplicons what parameters in classify would need to be changed?
On your own try running classify on the original preprocessed reads, skipping join, how do the results compare to the overlapped set?
5. Finally produce Abundance tables, should take less than 20 minutes
Lets make a new folder for the final output results.
mkdir Slashpile.results
View the help documentation and generate the results. When you provide dbcAmplicons abundance with a sample sheet it will include any additional metadata (extra columns added to the sample sheet) into the biom file for downstream processing.
dbcAmplicons abundance -h

dbcAmplicons abundance -S metadata/workshopSamplesheet.txt -O Slashpile.results/16sV1V3 -F Slashpile.intermediate/16sV1V3/Slashpile-16sV1V3.fixrank --biom > abundance.16sV1V3.log
view the log
cat abundance.16sV1V3.log
Try changing the -r parameter see what changes? what about the -t parameter? Once done playing rerun the above to get the final biom file for the next phase of analysis.
dbcAmplicons abundance command above (with –biom) produces four files: abundance, proportions, tax_info and biom files. Using cat, less, or more view these files. What do you see?
6. Split Reads by samples
For downstream processing in another application (post preprocessing/merging), or for submission to the SRA. splitReadsBySample produces SRA compatible output (read names) for each samples. Splits the reads by sample.
view the help documentation then run, placing output into the folder SplitBySample/16sV1V3
splitReadsBySample.py -h

splitReadsBySample.py -O SplitBySample/16sV1V3 -1 Slashpile.intermediate/16sV1V3/Slashpile-16sV1V3_R1.fastq.gz -2 Slashpile.intermediate/16sV1V3/Slashpile-16sV1V3_R2.fastq.gz
View the output folder, what do you see?
7. Write out the softare versions to a file in the folder for records keeping.
dbcVersionReport.sh &> VersionInfo.txt
8. Transfer the four output files from dbcAmplicons abundances to your computer. Can use scp or sftp
Transfer the abundances, proportions, tax_info, and biom file to your computer for processing in R. You can view the proportions, abundances, and tax_info files in excel. Take a look at the biom file format, is it readable?
9. Process the remaider of the amplicons. First perform ‘join’, check the output and then the remainder of the pipeline on the other amplicons: 16sV3V4, ITS1, ITS2, LSU
Post joining evaluate the results. –Hint: one of these should be processed differently than the others–
Once join is complete for all amplicons, setup and run the remainder of the pipeline for each amplicon.
Advanced Set up a slurm script to sbatch the job on the cluster.
FYI dbcAmplicons screen can be used when you want to remove read contaminants. Can be ran either before or after dbcAmplicons join. You provide a reference fasta file to screen and it will remove any reads that map to any sequence in that file.
dbcAmplicons screen -h