
Introduction to Command Line Interface
Outline:
- Setting up
- What is the command line?
- Syntax of a command
- Directory structure and filesystem navigation
- Repeating (and editing) previous commands
- Combining commands and redirecting output
- Creating and removing files
- Compression and archives
- Environment variables and bash wildcard characters
- Shell scripts and file permissions
Setting up
For Windows and Mac users, a few steps are needed to properly set up the command line for this course.
Windows
In order to get a command line terminal for Windows 10 or 11, you will need to enable the WSL (Windows Subsystem for Linux) and install Ubuntu. Follow these instructions for installation.
Once you have installed the Ubuntu terminal, open one, and copy and paste the following commands:
sudo apt install unzip
sudo apt install make
sudo apt install cmake
Mac
A Mac is already set up for the command line, but you will probably need to install homebrew and use it to install some other packages. Open up a terminal and paste in the following:
/bin/bash -c "$(curl -fsSL https://raw.githubusercontent.com/Homebrew/install/HEAD/install.sh)"
Press Enter. The installer will explain what it is doing and may need to install some other packages, such as Xcode. An admin password may be necessary. Once the installation is complete, use the brew install command to install different packages:
brew install wget
brew install gnu-sed
brew install coreutils
brew install make
brew install cmake
What is the command line?
The command-line interface, or CLI, is:
- a text-based tool (most of the time your mouse doesn’t work)
- a powerful, modular system of commands
- the foundation of many high-throughput bioinformatic analyses
The user interface that accepts typed commands and displays responses is called a shell. The shell may run any of a number of command languages. While these may differ slightly in syntax, they share the same basic principles. Common command languages include bash, zsh, dash, and pwsh.
To interact with the shell, users launch an application referred to as a terminal, typically Terminal (Mac) or Windows Shell (Windows).
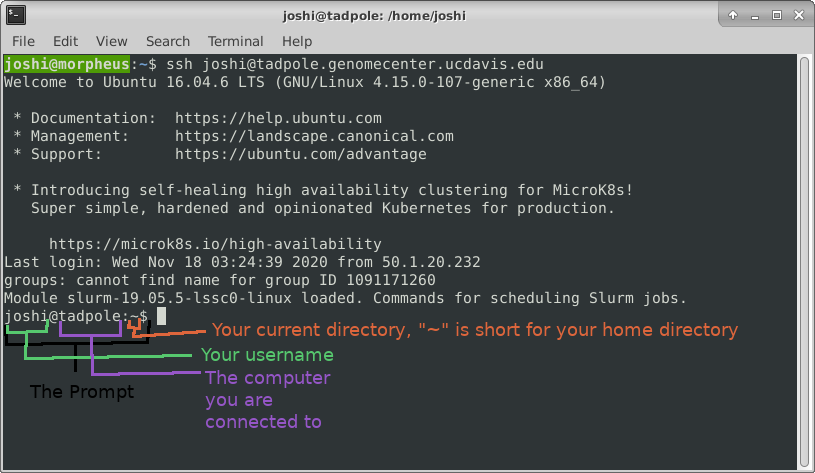
When a terminal application is launched, system messages are often displayed, followed by the prompt, short text at the start of the command line and ending with ‘$’ (in bash shell). The presence of the prompt indicates that the shell is ready to receive typed commands.
The prompt typically follows the form username:directory$ (when on a local computer) or username@server:current_directory$ (when logged into a remote host).
Syntax of a command
Programming languages, like spoken languages, have syntax. Instructions given in shell scripting languages are made up of a command, sometimes followed by one or more options or arguments. These elements are separated by spaces, and a return character creates the end of the “sentence.”
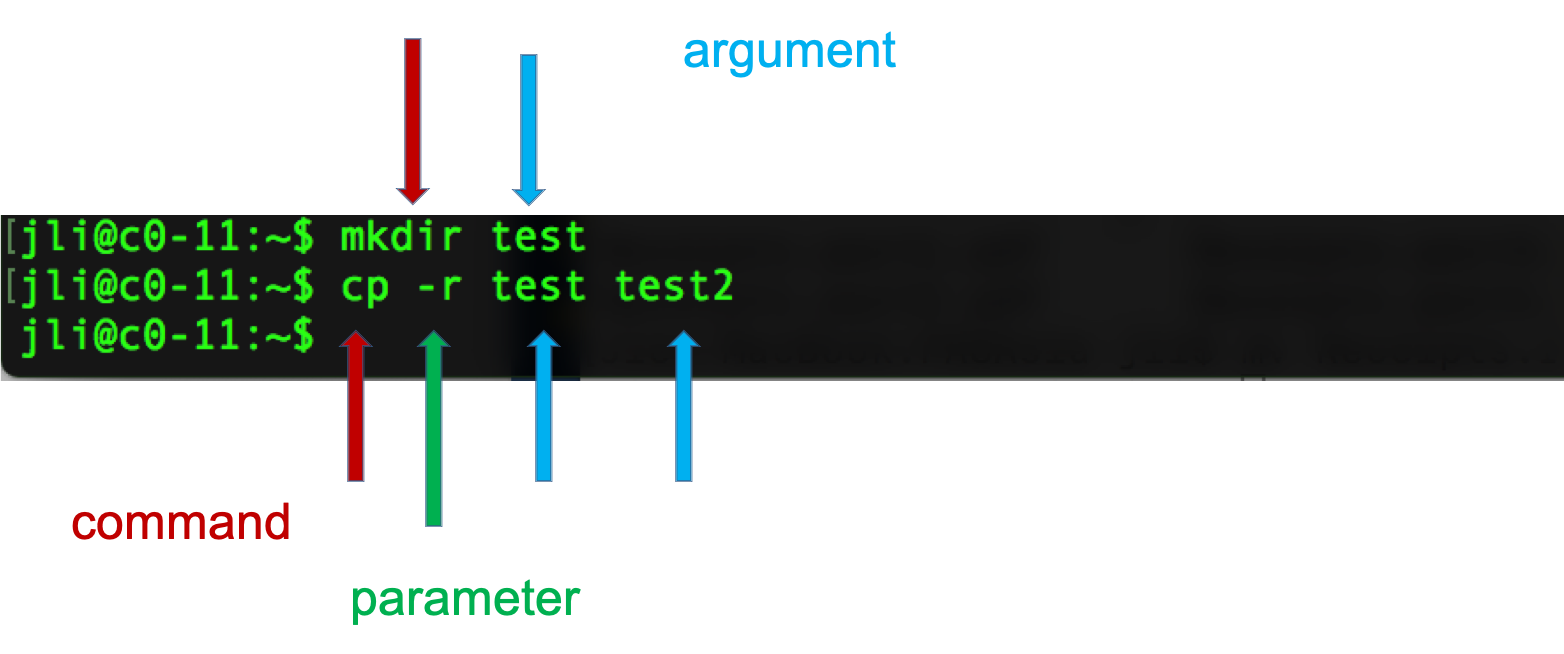
The code above tells the computer what to action do (copy, using the cp command), how to do it (recursively, with the -r option), and with what to perform the action (“test”, the directory specified by the argument).
Directory structure and filesystem navigation
When working on the command line, it is essential to know “where” you are operating from at any given moment. The files on your computer- everything from sequence FASTQs to software- is organized into a hierarchy of directories (also called folders) that can be imagined as the root system of a tree. By default, commands operate on the present working directory.
pwd
pwd
This command returns the present working directory (pwd), which you can think of as your current location within the filesystem’s tree structure. It answers the question “where am I?” with the path to your current location represented as a series of directories descending from the root (top-most level of the filesystem), separated by “/” characters.
ls
To find out what files and directories are contained within the pwd, we can list the contents of the directory.
ls
Like many other commands, the behavior of ls can be altered with options and arguments.
ls -R
The ‘-R’ option, for example, causes ls to list directories and files recursively. This may be a very long output depending on the contents of your pwd, so use Ctrl-C to break out of it. Sometimes you have to press Ctrl-C many times to get the terminal to recognize the interrupt signal.
The manual page for each command lists available options and describes their functions. To look up a command in the manual pages type “man” and then the command name.
man ls
Navigate this page using the up and down arrow keys, and then type ‘q’ to quit out of the manual and return to the shell.
In this manual page, find the following options, quit the page, and then try those commands. You could even open another terminal, log in again, and run manual commands in that terminal.
ls -l
ls -a
ls -l -a
ls -la
ls -ltrha
ls -ltrha --color
Adding an argument to the ls command enables listing the content of directories other than the pwd.
ls Desktop
cd
The present working directory is not static; you can move through the file system by changing directory (cd), using the path to your destination as an argument to cd.
cd Desktop
The location of any directory can be described in two ways:
- the absolute path begins from the root
-
the relative path begins from the present working directory
cd / cd home pwd
In a relative path, the “..” refers to the directory one level above the present location. To specify a directory two levels above the present working directory, use “../..”, and so on.
cd ..
pwd
The absolute path will always begin with a “/” character. When in doubt, use the absolute path.
cd /home/
pwd
Another special character is ‘~’, which represents the user’s home directory. This is the directory that a user starts in after starting a new shell or logging into a remote server.
cd ~
pwd
Notice that the location changes in the prompt with each cd.
Sometimes you will see a path begin with a single “.” character. One dot is the relative path to the pwd, such that ./file.txt is the path to a text file within the current directory.
mkdir
To add a directory to the filesystem, use ‘mkdir.’
mkdir fundamentals_2025
mkdir fundamentals_2025/cli
wget
As a rule, we try to avoid manually entering data on the command line. Here, we download an example dataset from a publicly exposed URL.
wget https://raw.githubusercontent.com/ucdavis-bioinformatics-training/2024-June-Introduction-to-the-Command-Line-for-Bioinformatics/master/cli/region.bed -O region.bed
ls
pwd
This code downloaded a copy of the region.bed file to the pwd. Let’s relocate it into our new fundamentals_2025/cli directory.
mv
The move (mv) command takes two arguments: what to move and where to put it.
mv region.bed fundamentals_2025/cli
It can also be used to rename a file if necessary.
cd fundamentals_2025/cli
ls
mv region.bed new_name.bed
ls
cp
Copying follows the same logic.
cp region.bed new_name.bed
cp region.bed region2.bed
ls
Tab completion
As a text-only interface, the CLI requires commands, options, and arguments to be typed correctly. Tab completion offers a way to save time and avoid errors.
A single <tab> auto-completes file or directory names when there’s only one name that could be completed correctly. If multiple files could satisfy the tab-completion, then nothing will happen after the first <tab>. In this case, press <tab> a second time to list all the possible completing names. Note that if you’ve already made a mistake that means that no files will ever be completed correctly from its current state, then repeated <tab> presses will do nothing.
cd # go to your home directory
cd fund
<tab> with no enter may complete to ‘fundamentals_2025’ - if not, press tab a second time to see available options. Another tab should complete the path to fundamentals_2025/cli. At that point, press enter to run the command.
ls r
<tab> with no enter should complete up to ‘region’ since that’s in common between region.bed and region2.bed. <tab> again to see the options. You should see two filenames. Type ‘2’ then <tab>. At this point, there is only one file available that meets the requirements, and tab completion should be able to fill in the remainder of the filename. Enter runs ‘ls region2.bed’ command.
The utility of tab completion cannot be overstated. Watch experienced users type; they hit tab once or twice in between almost every character. Use tab completion early and often, and you will save yourself a huge amount of typing and time.
wc
What is this region.bed file? Let’s start by getting an idea of it’s size.
wc region.bed
The word count command measures the number of lines, space-delimited words, and characters (counting whitespace, including return characters).
head and tail
To take a look at the first (10 by default) lines of a file, use ‘head’.
head region.bed
head --lines 5 region.bed
Tail works the same way, but with the last lines instead.
tail region.bed
tail --lines 1 region.bed
Quiz 1
Exercise 1
Practice moving around directories from the root directory. List directories and change directories using both absolute and relative paths. Use tab-completion! Find your root directory in a File Explorer and practice navigating there and then doing the same navigation on the command-line.
Repeating (and editing) previous commands
History
The shell remembers all commands run in the current session, which allows you to pull steps from your history, potentially modify them, and repeat them as needed.
Use the up arrow key to move back through the session history one line at a time. Press enter to rerun the command displayed.
The entire history of the shell session can be printed to the screen as well:
history
Note that the output from history is numbered. These line numbers allow the user to rerun a command without needing to move back through the session one line at a time.
!549 # re-executes the 549th command. Each session will have different numbers; choose one that re-runs a command of interest.
Editing a command
Here are some more ways to make editing previous commands, or novel commands that you’re building up, easier:
<up><up>  # go to some previous command, just to have something to work on
<ctrl-a>  # go to the beginning of the line
<ctrl-e>  # go to the end of the line
# left and right arrow keys will move one character at a time
<ctrl-left> # will move one word at a time to the left (may be option-left with some OS)
<ctrl-right> # will move one word at a time to the right
# now use left and right to move to a single word (surrounded by whitespace: spaces or tabs)
<ctrl-k>  # delete from here to end of line
<ctrl-w>  # delete from here to beginning of preceding word
blah blah blah<ctrl-w><ctrl-w>  # leaves you with only one 'blah'
You can also search your history from the command line:
history
<ctrl-r>man  # should find most recent command containing 'man' string
<enter>  # to run command
<ctrl-c>  # get out of recursive search without running anything
<ctr-r>  # repeat <ctrl-r> to find successively older string matches
Aliasing
As you work on the command line, you may find combinations of options you use frequently. If you would like to save keystrokes, you can create a shortcut to your command using ‘alias’.
alias ll='ls -lah'
ll
This shortcut will remain valid until the session ends. If you open a new shell, you will need to run the alias line again in order to make your customized ‘ll’ command available.
Combining commands and redirecting output
Command line tools are designed to be modular. Each one has a straightforward use-case (e.g. list files in a directory), with a fixed number of options available to modify it’s behavior. The true power of the command line only becomes apparent when combining these tools.
Pipes
The pipe (‘|’) passes output of one command to another command as input.
head region.bed | wc
head region.bed | cut -f 2       # print the second field
head region.bed | cut -f2 | sort # not a numeric sort!
man sort                         # remember: q to quit the manual
head region.bed | cut -f2 | sort -n
tail region.bed | grep CHR38     # grep selects lines containing the provided pattern
tail region.bed | grep CHR38 | cut -f2,3
Redirection
The redirection characters (‘>’ and ‘»’) allow you to put output into files.
wc region.bed > region_stats.txt
cat region_stats.txt # outputs the contents of the file to the terminal
head region.bed | wc > region_stats.txt # overwrote the region_stats file
cat region_stats.txt
Appending
To add to the end of a file instead of overwriting, use ‘»’.
wc region.bed > region_stats.txt # overwrite again
cat region_stats.txt
wc region2.bed >> region_stats.txt
cat region_stats.txt
STDOUT and STDERR
Programs can write to two separate output streams, ‘standard out’ (STDOUT), and ‘standard error’ (STDERR). The former is generally for direct output of a program, while the latter is supposed to be used for reporting problems. Some bioinformatics tools use STDERR to report summary statistics about the output, but this is probably bad practice. Default behavior in a lot of cases is to dump both STDOUT and STDERR to the screen, unless you specify otherwise. In order to nail down what goes where, and record it for posterity:
wc -c region.bed 1> chars.txt 2> any.err
the 1st output, STDOUT, goes to ‘chars.txt’
the 2nd output, STDERR, goes to ‘any.err’
ls
cat chars.txt
Contains the character count of the file genome.fa
cat any.err
Empty since no errors occurred.
Saving STDOUT is routine, but remember that explicitly saving STDERR is important on a remote server, since you may not directly see the ‘screen’ when you’re running jobs.
Removing files and directories
Occasionally, you may need to clean up files and directories created by accident, or no longer needed.
rm
We have a number of excess files created in previous sections.
ls       # what is in the current directory?
ls -lh   # more detail on file sizes
wc region.bed region2.bed new_name.bed # how many lines do these files have?
diff region.bed region2.bed # are these files the same?
diff region.bed new_name.bed
rm region2.bed new_name.bed
ls
The ‘rm’ command removes any files provided as arguments to the command.
rmdir
To demonstrate removing directories, let’s first create a temporary directory for the purpose.
mkdir tmp
cd tmp
echo 'Hello, world!' > first.txt
ls
cat first.txt
OK, let’s destroy what we just created:
cd ../
ls
rmdir tmp  # 'rmdir' means 'remove directory', but this shouldn't work!
rm tmp/first.txt
rmdir tmp  # should succeed now
The ‘rmdir’ command removes empty directories only. To remove a directory and all of its contents, remove all files from within the directory first, or…
Forced removal
When you’re on the command line, there’s no ‘Recycle Bin’. When we’ve expanded a whole directory tree, we need to be able to quickly remove a directory without clearing each subdirectory and using ‘rmdir’.
mkdir -p rmtest/dir1/dir2 # the -p option creates all the directories at once
rmdir rmtest # gives an error since rmdir can only remove directories that are empty
rm -rf rmtest # will remove the directory and EVERYTHING in it
Here -r = recursively remove sub-directories, -f means force. Obviously, be careful with ‘rm -rf’, there is no going back, if you delete something with rm, rmdir its gone! There is no Recycle Bin on the Command-Line!
Quiz 2
Compression and archives
As file sizes get large, you’ll often see compressed files, or whole compressed folders. Note that any good bioinformatics software should be able to work with compressed file formats.
head region.bed
gzip region.bed
ls
cat region.bed.gz # no longer human-readable
To uncompress a file
gunzip -c region.bed.gz
The ‘-c’ leaves the original file alone, but dumps expanded output to screen
gunzip -c region.bed.gz | head
ls
gunzip region.bed.gz  # uncompresses the file itself
ls
head region.bed
Tape archives, or .tar files, are one way to compress entire folders and all contained folders into one file. When they’re further compressed they’re called ‘tarballs’. We can use wget (web get).
wget -L -O PhiX_Illumina_RTA.tar.gz http://igenomes.illumina.com.s3-website-us-east-1.amazonaws.com/PhiX/Illumina/RTA/PhiX_Illumina_RTA.tar.gz
The .tar.gz and .tgz are commonly used extensions for compressed tar files, when gzip compression is used. The application tar is used to uncompress .tar files
tar -xzvf PhiX_Illumina_RTA.tar.gz
Here -x = extract, -z = use gzip/gunzip, -v = verbose (show each file in archive), -f filename
Note that, unlike Windows, linux does not depend on file extensions to determine file behavior. So you could name a tarball ‘fish.puppy’ and the extract command above should work just fine. The only thing that should be different is that tab-completion doesn’t work within the ‘tar’ command if it doesn’t see the ‘correct’ file extension.
BASH Wildcard Characters
We can use ‘wildcard characters’ when we want to specify or operate on sets of files all at once.
ls ?hiX/Illumina
list files in Illumina sub-directory of any directory ending in ‘hiX’
ls PhiX/Illumina/RTA/Sequence/*/*.fa
list all files ending in ‘.fa’ a few directories down. So, ‘?’ fills in for zero or one character, ‘*’ fills in for zero or more characters. The ‘find’ command can be used to locate files using a similar form.
find . -name "*.f*"
find . -name "*.f?"
how is this different from the previous ls commands?
Quick Note About the Quote(s)
The quote characters “ and ‘ are different. In general, single quotes preserve the literal meaning of all characters between them. On the other hand, double quotes allow the shell to see what’s between them and make substitutions when appropriate. For example:
VRBL=someText
echo '$VRBL'
echo "$VRBL"
However, some commands try to be ‘smarter’ about this behavior, so it’s a little hard to predict what will happen in all cases. It’s safest to experiment first when planning a command that depends on quoting … list filenames first, instead of changing them, etc. Finally, the ‘backtick’ characters ` (same key - unSHIFTED - as the tilde ~) causes the shell to interpret what’s between them as a command, and return the result.
 # counts the number of lines in file and stores result in the LINES variable
LINES=`cat PhiX/Illumina/RTA/Sequence/Bowtie2Index/genome.1.bt2 | wc -l`
echo $LINES
Symbolic Links
Since copying or even moving large files (like sequence data) around your filesystem may be impractical, we can use links to reference ‘distant’ files without duplicating the data in the files. Symbolic links are disposable pointers that refer to other files, but behave like the referenced files in commands. I.e., they are essentially ‘Shortcuts’ (to use a Windows term) to a file or directory.
The ‘ln’ command creates a link. You should, by default, always create a symbolic link using the -s option.
ln -s PhiX/Illumina/RTA/Sequence/WholeGenomeFasta/genome.fa .
ls -ltrhaF  # notice the symbolic link pointing at its target
grep ">" genome.fa
Quiz 3
Exercise 2
Let’s take a look at the ‘sed’ command. NOTE: On Macs use ‘gsed’. sed (short for stream editor) is a command that allows you to manipulate character data in various ways. One useful thing it can do is substitution.
cat region.bed | sed 's/CHR/chr/'
What happened? Only the first CHR changed. That is because we need to add the “g” option:
cat region.bed | sed 's/CHR/chr/g'
We can also do the the substitution without regards to case:
cat region.bed | sed 's/chr/chr/gi'
Let’s break down the argument to sed (within the single quotes)… The “s” means “substitute”, the word between the 1st and 2nd forward slashes (i.e. /) is the word the substitute for, the word between the 2nd and 3rd slashes is the word to substitute with, and finally the “gi” at the end are flags for global substitution (i.e. substituting along an entire line instead of just the first occurence on a line), and for case insenstivity (i.e. it will ignore the case of the letters when doing the substitution).
Note that this doesn’t change the file itself, it is simply piping the output of the cat command to sed and outputting to the screen. If you wanted to change the file itself, you could use the “-i” option to sed:
cat region.bed
sed -i 's/chr/chr/gi' region.bed
Now if you look at the file, the lines have changed.
cat region.bed
Another useful use of sed is for capturing certain lines from a file. You can select certain lines from a file:
sed '4q;d' region.bed
This will just select the 4th line from the file.
You can also extract a range of lines from a file:
sed -n '10,20p' region.bed
This gets the 10th through 20th lines from the file.
CHALLENGE: See if you can find a way to use sed to remove all the “CHR”s from the file.
Now, let’s delve into pipes a little more. Pipes are a very powerful way to look at and manipulate complex data using a series of simple programs. Let’s look at some fastq files. Get a few small fastq files:
wget https://raw.githubusercontent.com/ucdavis-bioinformatics-training/2024-June-Introduction-to-the-Command-Line-for-Bioinformatics/master/cli/C61.subset.fq.gz -O C61.subset.fq.gz
wget https://raw.githubusercontent.com/ucdavis-bioinformatics-training/2024-June-Introduction-to-the-Command-Line-for-Bioinformatics/master/cli/I561.subset.fq.gz -O I561.subset.fq.gz
wget https://raw.githubusercontent.com/ucdavis-bioinformatics-training/2024-June-Introduction-to-the-Command-Line-for-Bioinformatics/master/cli/I894.subset.fq.gz -O I894.subset.fq.gz
Since the files are gzipped files we need to use “zcat” to look at them (mac users may have to use “gzcat”). zcat is just like cat except for gzipped files:
zcat C61.subset.fq.gz | head
Fastq records are 4 lines per sequence, a header line, the sequence, a plus sign (which is historical), and then the quality encoding for the sequence. Notice that each header line has the barcode for that read at the end of the line. Let’s count the number of each barcode. In order to do that we need to just capture the header lines from this file. We can use “sed” to do that:
zcat C61.subset.fq.gz | sed -n '1~4p' | head
By default sed prints every line. In this case we are giving the “-n” option to sed which will not print every line. Instead, we are giving it the argument “1~4p”, which means to print the first line, then skip 4 lines and print again, and then continue to do that.
Now that we have a way to get just the headers, we need to isolate the part of the header that is the barcode. There are multiple ways to do this… we will use the cut command:
zcat C61.subset.fq.gz | sed -n '1~4p' | cut -d: -f10 | head
So we are using the “-d” option to cut with “:” as the argument to that option, meaning that we will be using the delimiter “:” to split the input. Then we use the “-f” option with argument “10”, meaning that we want the 10th field after the split. In this case, that is the barcode.
Finally, as before, we need to sort the data and then use “uniq -c” to count. Then put it all together and run it on the entire dataset:
zcat C61.subset.fq.gz | sed -n '1~4p' | cut -d: -f10 | sort | uniq -c
Now you have a list of how many reads were categorized into each barcode. Here is a sed tutorial for more exercises.
CHALLENGE: Find the distribution of the first 5 bases of all the reads in C61.subset.fq.gz. I.e., count the number of times the first 5 bases of every read occurs across all reads.
Let’s write a command to get the nucleotide count of the first 10,000 reads in a file. Use zcat and sed to get only the read lines of a file, and then only take the first 10,000:
zcat C61.subset.fq.gz | sed -n '2~4p' | head -10000 | less
Use grep’s “-o” option to get each nucleotide on a separate line (take a look at the man page for grep to understand how this works):
zcat C61.subset.fq.gz | sed -n '2~4p' | head -10000 | grep -o . | less
Finally, use sort and uniq to get the counts:
zcat C61.subset.fq.gz | sed -n '2~4p' | head -10000 | grep -o . | sort | uniq -c
And, voila, we have the per nucleotide count for these reads!
Exercise 3
Let’s copy the phiX-174 genome (using the ‘cp’ command) to our current directory so we can play with it:
cp ./PhiX/Illumina/RTA/Sequence/WholeGenomeFasta/genome.fa phix.fa
wc -l phix.fa
grep -c '>' phix.fa
cat phix.fa
This may not be useful for anything larger than a virus! Let’s look at the start codon and the two following codons:
grep --color "ATG......" phix.fa
’.’ characters are the single-character wildcards for grep. So “ATG……” matches any set of 9 characters that starts with ATG.
Use the –color ‘-o’ option to only print the pattern matches, one per line
grep -o "ATG......" phix.fa
Use the ‘cut’ command with ‘-c’ to select characters 4-6, the second codon
grep --color -o "ATG......" phix.fa | cut -c4-6
‘sort’ the second codon sequences (default order is same as ASCII table; see ‘man ascii’)
grep --color -o "ATG......" phix.fa | cut -c4-6 | sort
Combine successive identical sequences, but count them using the ‘uniq’ command with the ‘-c’ option
grep --color -o "ATG......" phix.fa | cut -c4-6 | sort | uniq -c
Finally sort using reverse numeric order (‘-rn’)
grep --color -o "ATG......" phix.fa | cut -c4-6 | sort | uniq -c | sort -rn
… which gives us the most common codons first
This may not be a particularly useful thing to do with a genomic FASTA file, but it illustrates the process by which one can build up a string of operations, using pipes, in order to ask quantitative questions about sequence content. More generally than that, this process allows one to ask questions about files and file contents and the operating system, and verify at each step that the process so far is working as expected. The command line is, in this sense, really a modular workflow management system.
Repeatability: loops and scripts
We just did this for one file, but what if we wanted to do it for all of our files? We certainly don’t want to type the command by hand dozens of times. We could edit and re-run commands from our history, but there’s an even faster way.
For loop
A for loop executes the code within it a set number of times.
for i in {1..21}; do echo $i >> a; done  # put multiple lines of code on one line, each line terminated by ';'
cat a
# <1 through 21 on separate lines>
The general form is:
The list can be a sequence of numbers or letters, or a group of files specified with wildcard characters:
for i in {3,2,1,liftoff}; do echo $i; done
for x in *.fq.gz; do echo $x; zcat $x | wc -l; done
While loop
You can pipe a command into a while loop and it will iterate through each line of the input. First, get a listing of all your files:
ls -1 *.fq.gz
Pipe that into a while loop and read in the lines into a variable called “x”. We use “$x” to get the value of the variable in that iteration of the loop:
ls -1 *.fq.gz | while read x; do echo $x is being processed...; done
Add the command we created above into the loop, placing $x where the filename would be and semi-colons inbetween commands:
ls -1 *.fq.gz | while read x; do echo $x is being processed...; zcat $x | sed -n '2~4p' | head -10000 | grep -o . | sort | uniq -c; done
When this runs it will print the name of every single file being processed and the nucleotide count for the reads from those files.
Now, let’s say you wanted to write the output of each command to a separate file. We would redirect the output to a filename, but we need to create a different file name for each command and we want the file name to reflect its contents, i.e. the output file name should be based on the input file name. So we use “parameter expansion”, which is fancy way of saying substitution:
ls -1 *.fq.gz | while read x; do echo $x is being processed...; zcat $x | sed -n '2~4p' | head -10000 | grep -o . | sort | uniq -c > ${x%.fq.gz}.nucl_count.txt; done
This will put the output of the counting command into a file whose name is the prefix of the input file plus “.nucl_count.txt”. It will do this for every input file.
Shell scripts
Often it’s useful to define a whole string of commands to run on some input, so that (1) you can be sure you’re running the same commands on all data, and (2) so you don’t have to type the same commands in over and over! Let’s use the ‘nano’ text editor program that’s pretty reliably installed on most linux systems.
nano test.sh
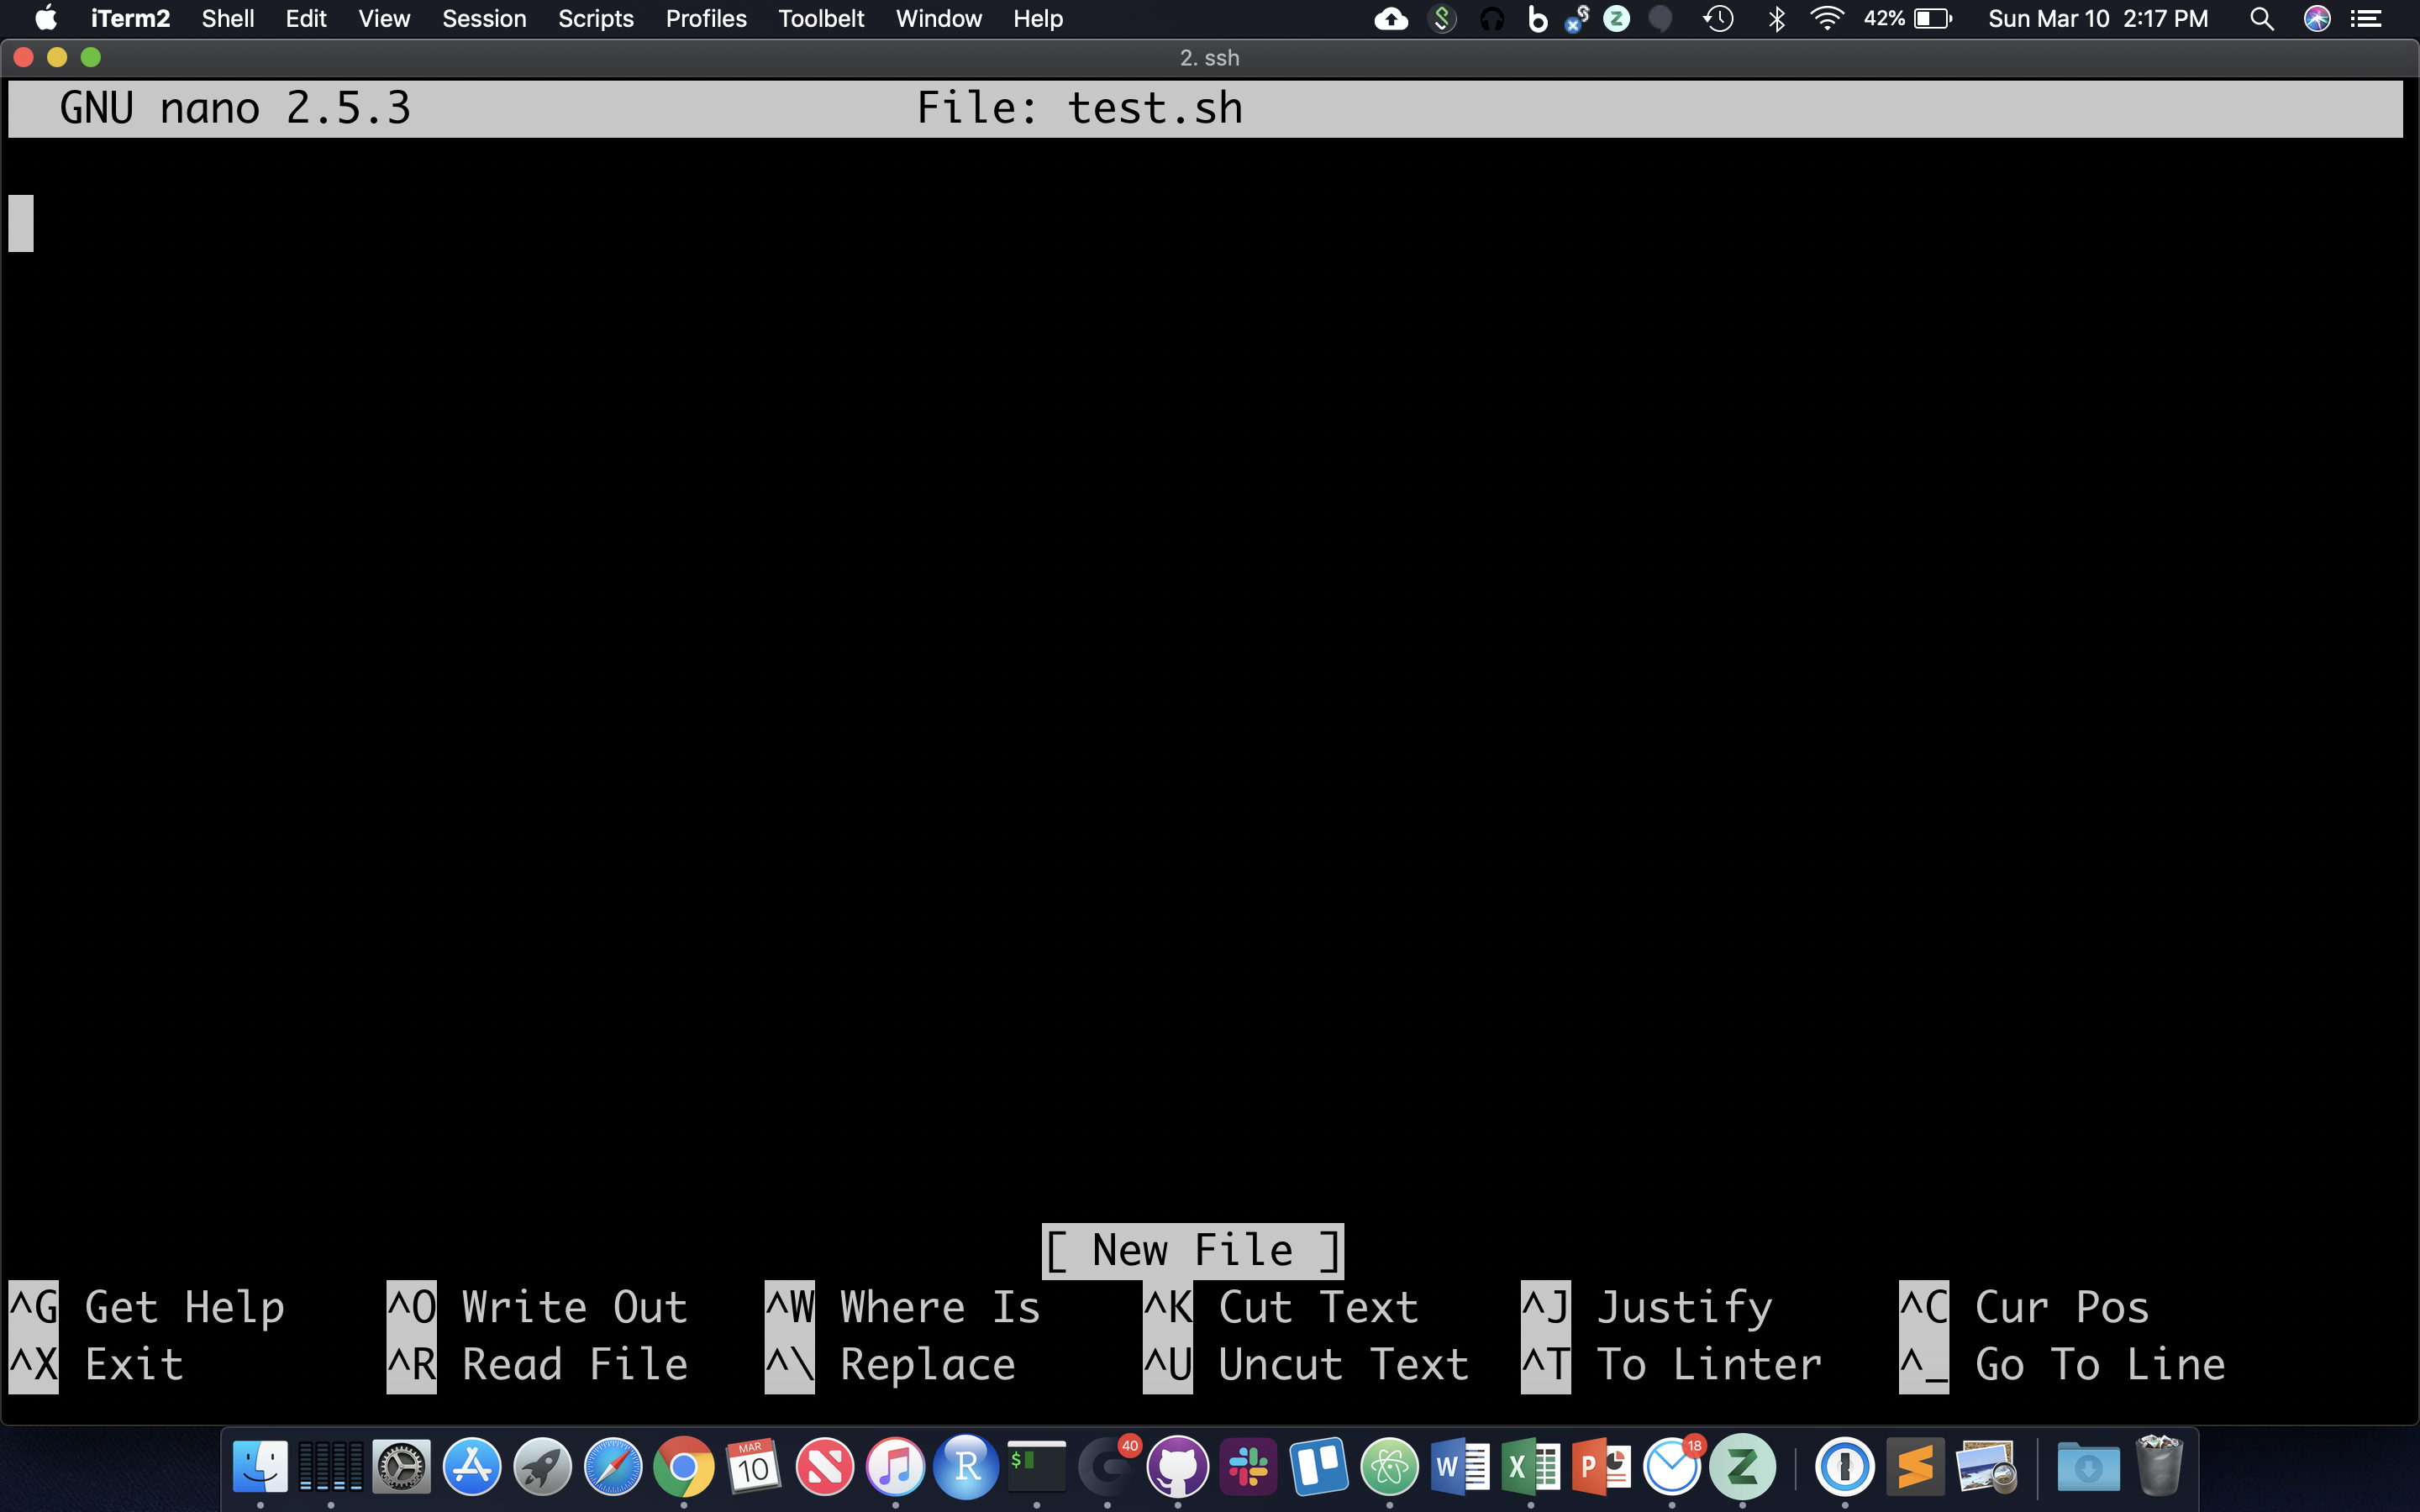
nano now occupies the whole screen; see commands at the bottom. Let’s type in a few commands. First we need to put the following line at the top of the file:
The “#!” at the beginning of a script tells the shell what language to use to interpret the rest of the script. In our case, we will be writing “bash” commands, so we specify the full path of the bash executable after the “#!”. Then, add some commands:
Hit Cntl-O and then enter to save the file, and then Cntl-X to exit nano.
File permissions
Though there are ways to run the commands in test.sh right now, it’s generally useful to give yourself (and others) ‘execute’ permissions for test.sh, really making it a shell script. Note the characters in the first (left-most) field of the file listing:
ls -lh test.sh
The first ‘-‘ becomes a ‘d’ if the ‘file’ is actually a directory. The next three characters represent read, write, and execute permissions for the file owner (you), followed by three characters for users in the owner’s group, followed by three characters for all other users. Run the ‘chmod’ command to change permissions for the ‘test.sh’ file, adding execute permissions (‘+x’) for the user (you) and your group (‘ug’):
chmod ug+x test.sh
ls -lh test.sh
The first 10 characters of the output represent the file and permissions. The first character is the file type, the next three sets of three represent the file permissions for the user, group, and everyone respectively.
- r = read
- w = write
- x = execute
So let’s run this script. We have to provide a relative reference to the script ‘./’ because its not our our “PATH”.:
./test.sh
And you should see all the commands in the file run in sequential order in the terminal.
Command Line Arguments for Shell Scripts
Now let’s modify our script to use command line arguments, which are arguments that can come after the script name (when executing) to be part of the input inside the script. This allows us to use the same script with different inputs. In order to do so, we add variables $1, $2, $3, etc…. in the script where we want our input to be. So, for example, use nano to modify your test.sh script to look like this:
Now, rerun the script using command line arguments like this:
./test.sh genome.fa 15 PhiX/Illumina/RTA/Annotation/Archives/archive-2013-03-06-19-09-31/Genes/ChromInfo.txt
Note that each argument is separated by a space, so $1 becomes “genome.fa”, $2 becomes “15”, and $3 becomes “PhiX/Illumina/RTA/Annotation/Archives/archive-2013-03-06-19-09-31/Genes/ChromInfo.txt”. Then the commands are run using those values. Now rerun the script with some other values:
./test.sh .. 5 genome.fa
Now, $1 becomes “..”, $2 is “5”, and $3 is “genome.fa”.
Open a new text file using the text editor “nano”:
nano get_nucl_counts.sh
Copy and Paste the following into the file:
Save the file and exit. Change the permissions on the file to make it executable:
chmod a+x get_nucl_counts.sh
Now, we can run this script giving it different arguments every time. The first argument (i.e. the first text after the script name when it is run) will get put into the variable “$1”. The second argument (delimited by spaces) will get put into “$2”. In this case, “$1” is the file name, and “$2” is the number of reads we want to count. So, then we can run the script over and over again using different values and the command will run based on those values:
./get_nucl_counts.sh I561.subset.fq.gz 1000
./get_nucl_counts.sh I561.subset.fq.gz 10000
./get_nucl_counts.sh C61.subset.fq.gz 555
We can also put loops into a script. We’ll take the loop we created earlier and put it into a file, breaking it up for readability and using backslashes for line continuation:
nano get_nucl_counts_loop.sh
Put this in the file and save it:
Make it executable:
chmod a+x get_nucl_counts_loop.sh
And now we can execute the entire loop using the script. Note that there is only one argument now, the number of reads to use:
./get_nucl_counts_loop.sh 100
Quiz 5
A CLI cheat sheet
HOMEWORK
Using the region.bed file, find the distance between the start and end coordinates for every line. You should be able to do this using only the command line. You will probably need to use the backtick characters to store the result of a command in a variable and you will also need to use the expr command. Look at the manual page for expr to learn how to use it. Once you have that figured out, create a shell script that will take a chromosome name as input and then will find the distances on each line for only that chromosome.