
Controlling Environments with Conda
What is conda and why do we care about it?
- Conda is a cross platform (Windows, Linux, MacOSx) environment management software.
- Works for any language, version, and library as specified by the user.
- Allows for easy control and maintenance of multiple environments with different specifications.
-
Allows for software packages and their dependencies to be easily loaded “automatically” via channels such as Bioconda, which specifically hosts a variety of bioinformatics software.
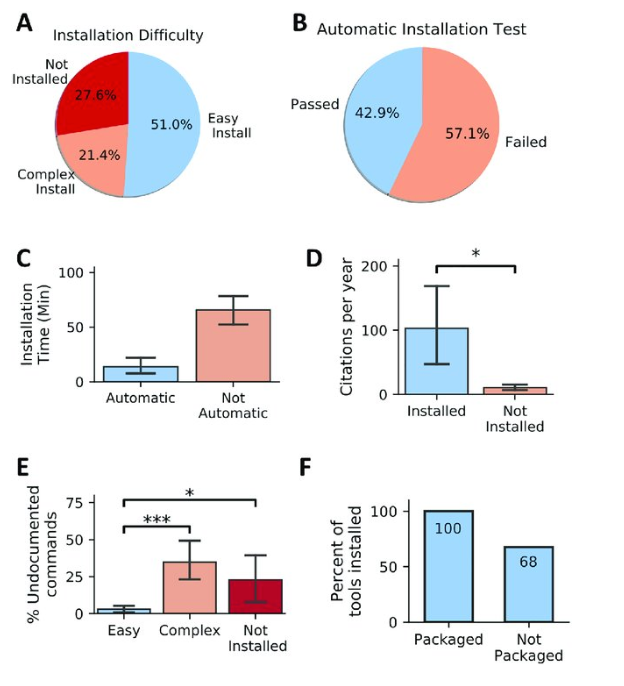
- Installability of 98 randomly selected published software tools across 22 life-science journals over a span of 15 years. Error bars, where present, indicate SEM. (A) Pie chart showing the percentage of tools with various levels of installability. (B) A pie chart showing the proportion of evaluated tools that required no deviation from the documented installation procedure. (C) Tools that require no manual intervention (pass automatic installation test) exhibit decreased installation time. (D) Tools installed exhibit increased citation per year compared with tools that were not installed (Kruskal-Wallis, p-value = 0.035). (E) Tools that are easy to install include a decreased portion of undocumented commands (Not Installed versus Easy Install: Mann-Whitney U test, p-value = 0.01, Easy Install versus Complex Install: Mann-Whitney U test, p-value = 8.3 × 10 −8 ). (F) Tools available in well-maintained package managers such as Bioconda were always installable, whereas tools not shipped via package managers were prone to problems in 32% of the studied cases. SEM, standard error of the mean. https://doi.org/10.1371/journal.pbio.3000333.g002
What are some of the main components of the conda CLI?
https://bioconda.github.io/recipes/htstream/README.html
First lets load the module for anaconda. Anaconda is the a set of packages, including conda, typically needed for a given environment.
module load anaconda3
Now lets create an environment in a specific path of interest. Here we want to download HTStream a tool for High Throughput Sequencing Read Processing.
HTStream Bioconda Documentation
conda create -p /share/workshop/$USER/htstream
- Type ‘y’ when prompted
Some initial conda setup (if you have not already done so)
conda init bash
source ~/.bashrc
Lets activate the environment that we just created
source activate /share/workshop/$USER/htstream
Now we should see that the environment at the start of our terminal is set to the path of our newly created environment.
(/home/keithgmitchell/htstream) keithgmitchell@tadpole:$
Finally lets modify this environment with a software of interest.
conda install -c bioconda htstream
Lets see what our environment looks like after running this.
conda list
Now lets say we created some software in python/R on top of htstream and we want to be able to distribute the environment to someone else or load if off of the cluster.
conda list -e > htstream_requirments.txt
We can now create and distribute our environment by supplying others with the requirements text file.
DON’T RUN THIS LINE
conda create --name new_environement --file htstream_requirements.txt -p ~/path_for_new_env
How does this compare with how the software HTStream would typically be installed?
DON’T RUN THESE LINEs
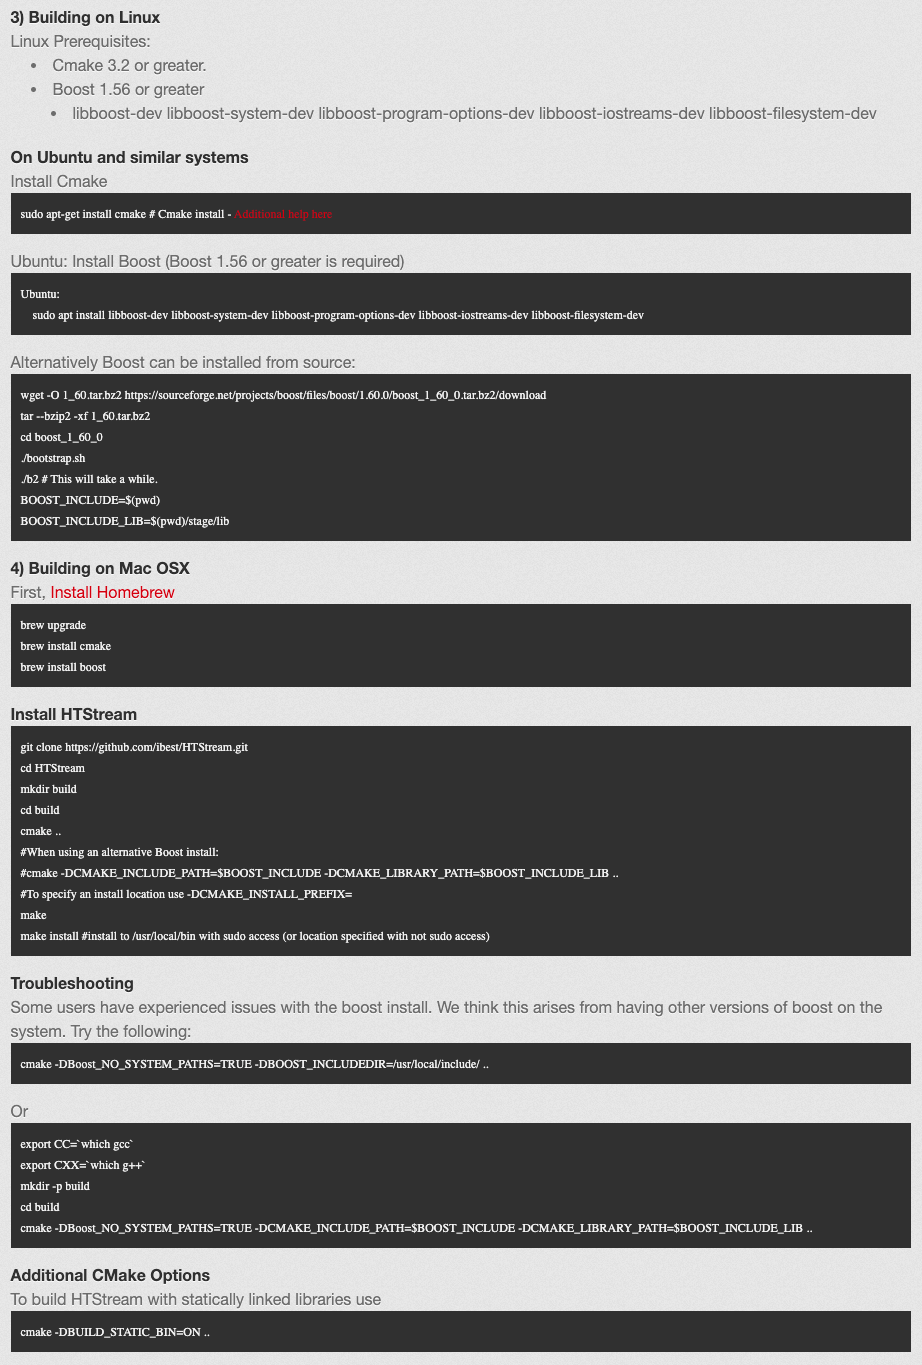
Compared to typical installations such as the one shown above, conda installs only requires one command. Conda is quicker, more user friendly, and more commonly results in success.
A few things for your future Conda usage:
When running conda on your own computer you will need to add channels, which is where conda will look when performing package installs
conda config --add channels defaults
conda config --add channels bioconda
conda config --add channels conda-forge